
Forget everything you know about the flimsy, translucent sheets found in the supermarket bread aisle. We are not making paper; we are engineering a structural marvel. Authentic Armenian lavash is a masterclass in gluten networking and hydration management. When you pull a fresh sheet from the heat, it should possess a specific, defiant snap that yields into a soft, chewy interior. This is the hallmark of Lavash Tensile Strength. It is the ability of the dough to stretch until it is nearly transparent without catastrophic structural failure. If your dough tears like wet tissue paper, your protein matrix has collapsed. We are here to ensure that never happens. We are looking for a dough that behaves like a high performance textile. It must be supple enough to wrap a kebab but resilient enough to withstand the blistering heat of a tonir or a cast iron surface. Prepare your workspace; we are about to turn simple flour and water into a culinary infrastructure that has sustained civilizations for millennia.
THE DATA MATRIX
| Metric | Specification |
|---|---|
| Prep Time | 20 Minutes |
| Execution Time | 45 Minutes |
| Yield | 10 to 12 Large Sheets |
| Complexity (1-10) | 6 |
| Estimated Cost per Serving | $0.22 |
THE GATHERS
Ingredient Protocol:
- 500g / 3.75 cups All-Purpose Flour (Minimum 11.5% Protein)
- 325ml / 1.3 cups Filtered Water (Warmed to 35C / 95F)
- 10g / 2 tsp Fine Sea Salt
- 5g / 1.5 tsp Active Dry Yeast
- 15ml / 1 tbsp Neutral Oil (Grape seed or Avocado)
Section A: Ingredient Quality Audit:
If your flour lacks the necessary protein content, your Lavash Tensile Strength will be non-existent. Soft pastry flours will crumble rather than stretch. To fix a low protein flour, you can infuse the mix with a tablespoon of vital wheat gluten. If your water is too hard, the minerals can toughen the gluten too quickly; use filtered water to maintain a viscous and manageable dough consistency. If your yeast is sluggish, do not proceed. Test it in a small amount of warm water with a pinch of sugar; if it does not aerate and foam within five minutes, discard it. Sub-par salt can also ruin the flavor profile; avoid iodized table salt which can impart a metallic, piquant aftertaste that distracts from the toasted grain notes.
THE MASTERCLASS
Step-by-Step Execution:
1. The Hydration Phase
Combine your warmed water and yeast in the bowl of a stand mixer. Allow the yeast to bloom until it becomes a frothy, viscous suspension. Gradually add the flour and salt. Use a digital scale for this process; volumetric measurements are the enemy of consistency in high-tensile doughs.
Pro Tip: Accurate hydration is the foundation of elasticity. Using a digital scale ensures the water-to-protein ratio allows the glutenin and gliadin to bond effectively without becoming a sticky mess.
2. The Kinetic Development
Attach the dough hook and knead on medium-low speed for 8 to 10 minutes. You are looking for the dough to clear the sides of the bowl and develop a smooth, satiny sheen. Use a bench scraper to manage the dough if you choose to finish the knead by hand on a marble surface.
Pro Tip: This mechanical energy is what builds the gluten "springs." If the dough feels too tight, let it rest for five minutes to relax the bonds before continuing.
3. The Bulk Fermentation
Place the dough in a lightly oiled glass bowl. Cover with a damp cloth and keep in a draft-free environment at 24C (75F). Allow it to double in size. This usually takes 60 to 90 minutes depending on your ambient kitchen temperature.
Pro Tip: Fermentation isn't just about rise; it is about flavor development. Slow fermentation allows enzymes to break down starches into simpler sugars, which will later render a superior char during the bake.
4. The Precision Division
Punch down the dough to release excess gas. Use your bench scraper to divide the dough into 60g portions. Roll each portion into a tight, seamless ball. This tensioning of the outer skin is vital for the final stretch.
Pro Tip: Consistent sizing ensures even cooking times. A digital scale is once again your best friend here to avoid "hot spots" or undercooked centers in varying bread sizes.
5. The Translucent Stretch
On a lightly floured surface, roll each ball into a circle, then switch to a long, thin rolling pin (an okhlavoo) to stretch it into an oval. The dough should be thin enough to see the grain of your wooden board through it. This is the peak of Lavash Tensile Strength.
Pro Tip: If the dough snaps back, the gluten is too tense. Cover the rounds with plastic wrap and wait ten minutes. Patience is a professional tool.
6. The Thermal Shock
Heat a large cast iron griddle or a saucier base until it is screaming hot. Lay the dough flat. Within 30 seconds, bubbles should form. Flip it. The entire process should take less than 90 seconds per side.
Pro Tip: The high heat causes the internal moisture to flash into steam, which puffs the bread and creates those iconic charred "leopard spots."
Section B: Prep & Timing Fault-Lines:
The most common human error is rushing the rest periods. If you attempt to roll the dough immediately after kneading, the tensile strength will work against you, causing the bread to shrink and thicken. Another failure point is temperature control. If your griddle is not hot enough, the bread will dehydrate and turn into a giant cracker instead of a flexible wrap. Use an infrared thermometer to ensure your surface is at least 200C (400F) before the first sheet hits the metal.
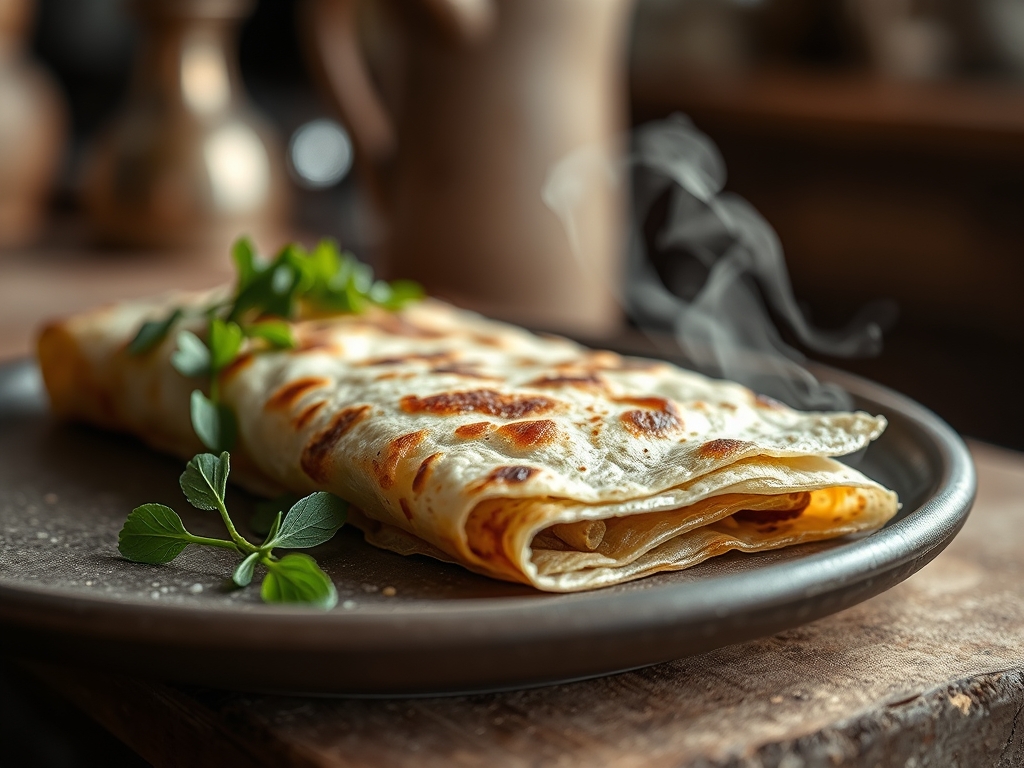
THE VISUAL SPECTRUM
Section C: Thermal & Visual Troubleshooting:
Referencing the Masterclass photo, your lavash should exhibit a variegated landscape of cream, gold, and deep umber. If your bread is a uniform, dull beige, your heat is too low; you are drying the dough rather than searing it. If the bubbles are massive and burnt while the rest of the bread is raw, your rolling technique was uneven. Ensure the thickness is consistent from the center to the edge. If the bread appears translucent in patches after cooking, it was rolled too thin and the structural integrity has failed. The goal is a "leopard spotting" pattern that indicates a perfect balance of moisture and high-heat contact.
THE DEEP DIVE
Macro Nutrition Profile
A single sheet of authentic lavash (approx. 60g) contains roughly 160 calories, 5g of protein, 32g of carbohydrates, and less than 2g of fat. It is a low-density carbohydrate source that provides sustained energy without the heavy fats found in brioche or enriched breads.
Dietary Swaps
- Vegan: This recipe is naturally vegan. To enhance the flavor, brush the finished bread with a touch of olive oil.
- Keto: Replace wheat flour with a blend of almond flour, vital wheat gluten, and xanthan gum. Note that the tensile strength will be significantly lower.
- GF: Use a high quality 1-to-1 gluten-free flour blend with added psyllium husk to mimic the elasticity of gluten.
Meal Prep & Reheating Science
To maintain the molecular structure, store cooled lavash in an airtight bag with a slightly damp paper towel. To reheat, avoid the microwave, which turns the starches rubbery. Instead, flash-heat the bread on a dry skillet for 15 seconds per side to re-activate the surface oils and soften the internal crumb.
THE KITCHEN TABLE
Why does my lavash get hard as a rock after cooling?
You likely cooked it too long at too low a temperature. This evaporated all internal moisture. High heat and short duration are the keys to maintaining a flexible, wrap-ready texture that survives the cooling process.
Can I use bread flour instead of all-purpose?
Yes. Bread flour has a higher protein content which will actually increase your Lavash Tensile Strength. However, you may need to increase the hydration by 5 percent to account for the higher absorption rate of the stronger flour.
My dough is sticking to everything. What happened?
Your hydration is likely too high for your local humidity. Dust your work surface with flour, but do not over-incorporate it into the dough. Use a bench scraper to lift the dough cleanly without tearing the delicate gluten skin.
How do I get those big bubbles in the bread?
Bubbles are a result of "oven spring." Ensure your dough is at room temperature before hitting the hot pan. The temperature differential between the dough and the cast iron creates the steam pressure necessary for those beautiful air pockets.

