
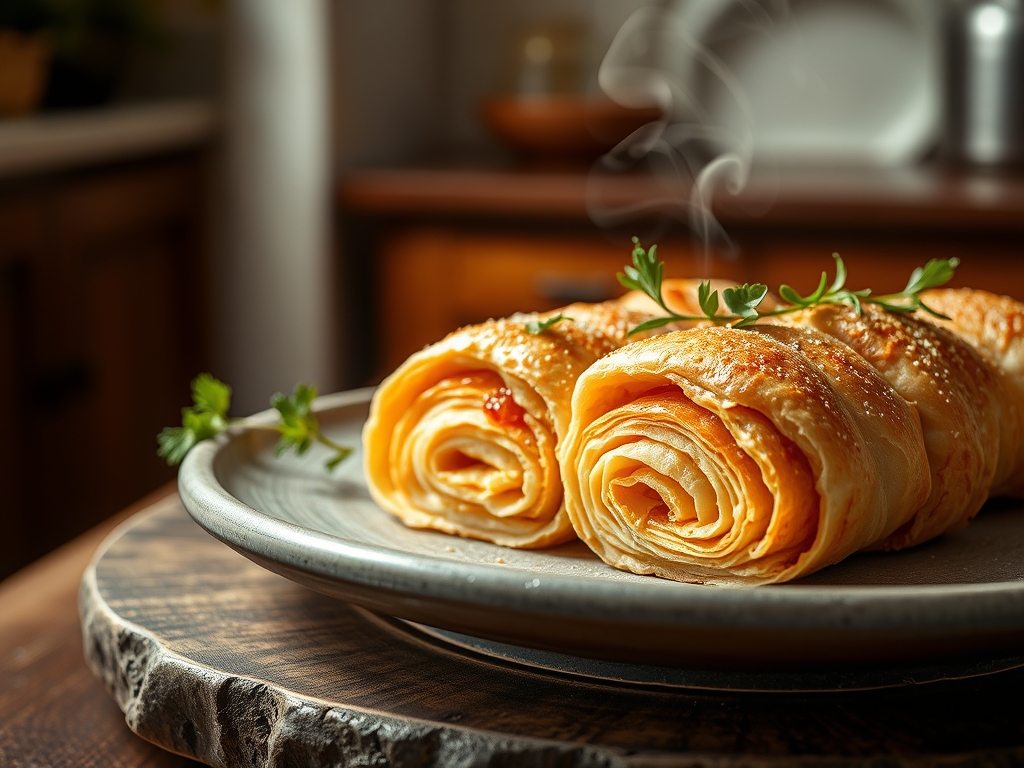
Listen to the sound of structural failure. It is the rhythmic, glass-shattering crunch of a thousand microscopic butter-walls collapsing under the pressure of a serrated blade. We are not merely baking bread; we are performing high-stakes architectural engineering at the micron level. The subject of today's audit is the undisputed sovereign of the patisserie: Croissant Lamination. This is a process defined by the violent tension between cold lipids and elastic gluten. When you bite into a masterpiece, you are experiencing the rapid expansion of water vapor trapped between layers of dough, forced upward by the heat of the oven to create a honeycomb of airy pockets. If your layers are muddy, you have failed the thermodynamic test. If your crumb is bready, your lamination has suffered a total systemic collapse. We are here to ensure that every fold is a testament to precision and every flake is a razor-sharp shard of golden perfection. Strap in; we are about to deconstruct the triglyceride stratification of the world's most temperamental pastry.
THE DATA MATRIX
| Metric | Specification |
|---|---|
| Prep Time | 45 Minutes (Active) |
| Execution Time | 18 to 24 Hours (Including Rests) |
| Yield | 12 to 15 Croissants |
| Complexity (1-10) | 9.5 (Critical Precision Required) |
| Estimated Cost per Serving | $0.85 – $1.25 |
THE GATHERS
Ingredient Protocol:
- 500g / 4 cups All-Purpose Flour (11.5 percent protein minimum)
- 60g / 4.5 tbsp Granulated Sugar
- 10g / 2 tsp Fine Sea Salt
- 10g / 1 tbsp Instant Yeast
- 300ml / 1.25 cups Whole Milk (Chilled)
- 50g / 3.5 tbsp Unsalted Butter (Softened for the dough)
- 250g / 1.1 cups High-Fat European Style Butter (82 percent fat minimum for the Beurrage)
- 1 Large Egg (For the wash)
Section A: Ingredient Quality Audit:
If your flour has a protein content below 11 percent, the gluten network will lack the tensile strength to hold the expanding steam; the result is a flat, sad disk. To fix this, replace 10 percent of the volume with bread flour to infuse the matrix with extra strength. If your butter has a high water content (standard supermarket butter), it will shatter when cold or bleed into the dough when warm. You must seek out European-style butter with a higher fat-to-water ratio. If your yeast is sluggish, do not proceed. Perform a bloom test in warm milk to ensure it can aerate the heavy dough. Sub-par lipids lead to greasy textures; always prioritize the quality of the fat block.
THE MASTERCLASS
1. The Détrempe Construction
Combine the flour, sugar, salt, yeast, and softened butter in a stand mixer. Slowly add the chilled milk. Mix on low speed until a shaggy mass forms, then increase to medium for 4 minutes. We are looking for partial gluten development; do not overwork it. Flatten into a disk, wrap tightly in plastic, and refrigerate for at least 6 hours.
Pro Tip: Use a digital scale for every gram. Volumetric measurements are the enemy of consistency in lamination. The goal is to keep the dough cold to prevent the yeast from over-activating before the folds are complete.
2. The Beurrage Preparation
Place your cold, high-fat butter between two sheets of parchment paper. Use a heavy rolling pin to pound it into a 15cm x 15cm square. It must be pliable but still cold. This is the "plastic" state where the butter can bend without snapping.
Pro Tip: Use a bench scraper to square off the edges of your butter block. Perfectly straight edges in the butter block ensure that the fat reaches the very corners of the dough during the first fold, preventing "blind spots" of dry dough.
3. The Lock-In Phase
Roll your chilled dough into a 30cm x 15cm rectangle. Place the butter block in the center and fold the dough flaps over it so they meet in the middle. Seal the seams tightly. You have now created the initial triglyceride sandwich.
Pro Tip: Use a straight-edge ruler to verify dimensions. If the dough is wider than the butter, you will have uneven layers. The "Lock-In" is the most critical moment for maintaining the structural integrity of the Croissant Lamination.
4. The Lamination Cycles
Roll the dough out into a long rectangle and perform a "letter fold" (folding in thirds). Rotate 90 degrees and repeat. This is your first "turn." You will perform three turns in total, with 60-minute rests in the refrigerator between each to allow the gluten to relax and the butter to re-chill.
Pro Tip: If the dough resists rolling, it is telling you the gluten is too tense. Stop immediately and return it to the fridge. Forcing the dough will cause the butter to tear through the layers, destroying the stratification.
5. Final Shaping and Proofing
Roll the dough to a 4mm thickness. Cut into tall triangles using a pizza wheel or sharp knife. Stretch the base slightly and roll tightly toward the point. Place on a lined tray and proof at 24-26 degrees Celsius for 2 hours until they wobble like jelly.
Pro Tip: Use a thermometer to monitor the proofing environment. If the room is hotter than 28 degrees Celsius, the butter will render and leak out of the dough, ruining the internal honeycomb before it even hits the oven.
Section B: Prep & Timing Fault-Lines:
The most common failure is the "shatter." This occurs when the butter is too cold during rolling, causing it to break into internal shards rather than forming continuous sheets. If you see "marbling," your butter has integrated into the dough rather than layering. To fix this, ensure the dough and butter are within 2 degrees of each other before rolling. Another fault is under-proofing; if the croissant does not double in size, the layers will be dense and doughy.
THE VISUAL SPECTRUM
Section C: Thermal & Visual Troubleshooting:
Observe the Masterclass photo above. Note the "shattering" effect on the exterior crust; this indicates a successful Maillard reaction and high-fat content. If your croissants are dull and pale, your egg wash was too thin or your oven temperature was too low. If the "honeycomb" inside looks like bread with small holes, your lamination was compromised by heat. If you see a pool of butter on the baking sheet, your proofing temperature was too high, causing the fat to melt out of the structure. The final product should be deep mahogany, feeling impossibly light for its size.
THE DEEP DIVE
Macro Nutrition Profile:
A standard 70g croissant contains approximately 280-320 calories. The profile is dominated by lipids (16g-20g) and carbohydrates (28g-34g). While high in saturated fats, the artisanal version avoids the trans-fats found in commercial "crescent rolls."
Dietary Swaps:
- Vegan: Replace butter with a high-quality vegan block fat (coconut/shea based) that has a high melting point. Use soy milk for the dough and an agave-water wash for shine.
- Keto/GF: Extremely difficult due to the need for gluten elasticity. However, almond flour blends with xanthan gum can mimic the structure, though the "flake" will be more of a "crumble."
Meal Prep & Reheating Science:
To maintain the molecular structure, never microwave a croissant; the moisture will turn the crust into a rubbery mess. Reheat in a 175 degree Celsius oven for 5 minutes to re-crisp the outer layers and soften the internal fats. For long-term storage, flash-freeze shaped, unbaked croissants and bake directly from frozen, adding 5 minutes to the bake time.
THE KITCHEN TABLE
Why is my croissant dough shrinking back?
Your gluten is over-developed or under-rested. The protein chains are acting like rubber bands. Give the dough another 30 minutes in the refrigerator to relax the molecular tension before attempting to roll it further.
Can I use salted butter for the lamination?
It is not recommended. Salted butter has a higher water content and varies in salinity. Using unsalted butter allows you to control the seasoning precisely and ensures the fat remains "plastic" during the heavy rolling phases.
What causes the "bready" texture inside?
This is usually caused by the butter getting too warm and absorbing into the dough. Once the fat integrates with the flour, you lose the separation required for steam to create those distinct, airy pockets.
How do I get that deep mahogany color?
The secret is a double egg wash. Apply the first layer before proofing and the second layer just before baking. This creates a thick protein film that undergoes an intense Maillard reaction in the oven's heat.

