
The scent of blooming yeast is not just an aroma; it is a chemical broadcast of impending structural success. We are not merely baking bread here. We are conducting a high-stakes engineering project where the primary load-bearing material is a high-protein, egg-fortified dough. The secret to a loaf that commands the table lies in Challah Braiding Tension. Without proper tension, your braid is a chaotic mess of uneven expansion. With it, you achieve a symmetrical, golden-brown masterpiece that retains its loft even after the cooling phase. We are looking for that specific, taut resistance in the strands that allows the gluten network to expand upward rather than outward. This is the difference between a professional-grade centerpiece and a flat, amorphous blob of carbohydrates. We want the crumb to be tight yet pillowy, a feat achieved only through meticulous manipulation of the dough strands. Every twist is a calculated move in the game of culinary physics. Prepare your workstations; we are about to audit the very foundation of enriched dough architecture.
THE DATA MATRIX
| Metric | Specification |
|---|---|
| Prep Time | 45 Minutes (Active) |
| Execution Time | 4 Hours (Including Proofing) |
| Yield | 2 Large Braided Loaves |
| Complexity (1-10) | 7 |
| Estimated Cost per Serving | $0.85 USD |
THE GATHERS
Ingredient Protocol:
- High-Protein Bread Flour: 1000g / 8 cups
- Warm Water (110F): 350ml / 1.5 cups
- Active Dry Yeast: 14g / 4.5 teaspoons
- Granulated Sugar: 150g / 0.75 cups
- Neutral Vegetable Oil: 120ml / 0.5 cups
- Large Egg Yolks (Room Temp): 4 units / 72g
- Whole Large Eggs: 2 units / 100g
- Fine Sea Salt: 18g / 3 teaspoons
- Honey: 30ml / 2 tablespoons
- Egg Wash: 1 egg beaten with 15ml water
Section A: Ingredient Quality Audit:
If your yeast fails to foam within five minutes of hydration, the viability is compromised; discard and recalibrate with fresh culture. Sub-par flour with low protein content (less than 12 percent) will result in a structural collapse during the second proof. To fix a low-protein flour, replace 20g of the total flour weight with vital wheat gluten. If your eggs are cold, they will shock the yeast and stall fermentation; submerge them in warm water for five minutes to reach an optimal 70F. Using a low-quality oil can introduce off-flavors; always opt for a neutral, high-smoke point oil like grapeseed or refined sunflower oil to ensure the honey and egg notes remain the primary sensory profile.
THE MASTERCLASS
1. The Initial Hydration and Autolyse
Combine your warm water, yeast, and a tablespoon of sugar in the bowl of a stand mixer. Once the mixture is viscous and foamy, add the remaining sugar, honey, oil, and eggs. Use a digital scale to ensure the flour weight is exact before adding it to the wet base. Mix on low until a shaggy mass forms.
Pro Tip: Allowing the dough to rest for ten minutes before active kneading—a modified autolyse—allows the flour to fully hydrate. This makes the dough less sticky and more manageable without the need for excess flour, which can toughen the final crumb.
2. Developing the Gluten Matrix
Attach the dough hook and knead on medium speed for 8 to 10 minutes. The dough must clear the sides of the bowl and pass the windowpane test. Use a bench scraper to clear any debris from the work surface and ensure the dough is a smooth, elastic sphere.
Pro Tip: The science of Challah Braiding Tension begins here. A well-developed gluten network is the only way to maintain the structural integrity of the braid. If the dough tears during the windowpane test, continue kneading; the protein chains have not yet linked.
3. Primary Fermentation and Degassing
Place the dough in a lightly oiled bowl and cover with a damp cloth. Let it rise in a warm, draft-free environment until doubled in volume. Once risen, use your fist to gently render the air out of the dough, a process known as degassing, to redistribute the yeast and sugars.
Pro Tip: Do not over-proof during this stage. If the dough rises too far, the yeast will exhaust its food supply; this leads to a pale crust and a lack of oven spring. Use a digital thermometer to ensure your proofing environment is between 75F and 80F.
4. Precision Division and Shaping
Divide the dough into equal portions using your digital scale for absolute symmetry. Roll each portion into a smooth cylinder, then let them rest for five minutes. This relaxes the gluten, allowing you to stretch the strands to the desired length without them snapping back.
Pro Tip: For a professional finish, use a bench scraper to cut the dough cleanly rather than pulling it. Pulling tears the gluten strands you worked so hard to build. Uniformity in strand weight is the prerequisite for a balanced braid.
5. Executing the High-Tension Braid
Pinch the tops of your strands together firmly. Cross the strands over each other, maintaining a constant, firm pull. This is where Challah Braiding Tension is applied. Each tuck should feel secure but not strained to the point of tearing.
Pro Tip: If the braid feels loose, the loaf will expand horizontally and lose its definition. Professional bakers use a "tuck and pull" method to ensure the exterior skin of each strand is taut, which encourages the bread to aerate vertically during the bake.
6. The Final Proof and Glaze
Place the braided loaves on a parchment-lined sheet. Brush with a thin layer of egg wash, ensuring every crevice is coated. Let rise for another 45 minutes. Just before loading into the oven, apply a second coat of egg wash for a high-gloss, lacquered finish.
Pro Tip: The double-glaze technique is a professional secret for that deep, mahogany color. The first coat soaks into the dough, while the second coat sits on top to infuse the crust with a piquant, caramelized sheen through the Maillard reaction.
Section B: Prep & Timing Fault-Lines:
The most common failure in Challah production is rushing the second proof. If the dough does not feel like a soft marshmallow when poked, it is under-proofed and will rupture in the oven. Conversely, if the kitchen is too hot, the fats in the dough can begin to melt, destroying the crumb structure. If you find your kitchen is exceeding 85F, move the dough to a cooler area or even the refrigerator to slow down the enzymatic activity. Timing is the silent ingredient; use a stopwatch to track every phase.
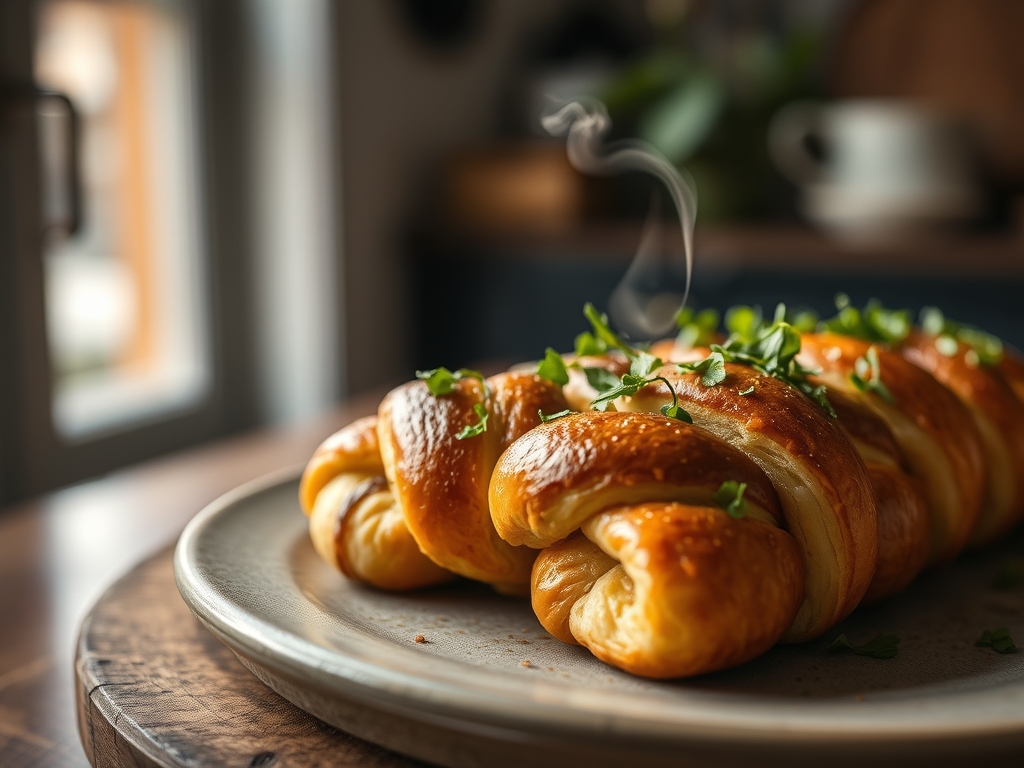
THE VISUAL SPECTRUM
Section C: Thermal & Visual Troubleshooting:
Observe the photo in the Masterclass section. Note the deep contrast between the dark ridges and the lighter "valleys" of the braid. This is the hallmark of proper Challah Braiding Tension. If your loaf is a uniform, dull brown, you likely skipped the second egg wash or your oven temperature is too low. If the braid has "shredded" or burst at the seams, your tension was too high or the dough was under-proofed, causing an explosive gas release. Uneven browning usually indicates a hot spot in the oven; rotate your pans 180 degrees halfway through the baking cycle to ensure a symmetrical thermal distribution.
THE DEEP DIVE
Macro Nutrition Profile:
A standard slice (approx. 50g) contains roughly 160 calories, 5g of protein, 28g of carbohydrates, and 4g of fat. The high egg content provides a significant boost in Vitamin D and Choline compared to standard white breads.
Dietary Swaps (Vegan/Keto/GF):
- Vegan: Replace eggs with a "flax egg" (1 tbsp ground flax to 3 tbsp water) and use agave nectar instead of honey. Use a soy-milk wash for the crust.
- Keto: This is difficult given the reliance on gluten, but almond flour and xanthan gum can be used with a significant loss in "braidability."
- Gluten-Free: Use a high-quality GF bread blend with added psyllium husk to mimic the elasticity required for braiding.
Meal Prep & Reheating Science:
To maintain molecular structure, store Challah in a paper bag for 24 hours or wrap tightly in plastic and freeze. To reheat, avoid the microwave, which turns the starch into a rubbery mess. Instead, use a toaster oven at 350F for five minutes to re-crisp the crust and soften the interior.
THE KITCHEN TABLE
Why did my braid flatten out?
This is a classic failure of Challah Braiding Tension. If the strands are not rolled tightly and braided with enough resistance, the dough expands outward. Ensure your gluten is fully developed and your strands are taut during the shaping process.
Can I use honey instead of sugar?
Yes, but honey is a humectant and will make the dough stickier. You may need to increase your flour by 20-30 grams to compensate for the added moisture. Honey also promotes faster browning, so watch your oven carefully.
My crust is too hard; what happened?
Overbaking or a lack of steam in the initial minutes of baking can cause a thick, tough crust. Ensure you are using a digital thermometer to pull the bread when the internal temperature hits exactly 190F.
Why is the inside of my bread gummy?
Gummy interiors are the result of cutting the bread while it is still hot. The steam inside the loaf is still finishing the cooking process. Wait at least one hour before slicing to allow the starch structure to set.

