
Listen up, carbon-based life forms. You are not just baking bread; you are managing a biological construction site where the primary laborers are millions of gas-producing microbes. When we talk about a Sourdough Crumb Audit, we are conducting a structural integrity survey of a gluten-based skyscraper. The goal is simple: achieve a translucent, gelatinized interior that defies the laws of physics. You want those cavernous alveoli, that shimmering sheen on the cell walls, and a crust that shatters like stained glass. If your loaf feels like a dense brick of disappointment, your infrastructure has failed. We are here to troubleshoot the pneumatic pressure of your wild yeast networks. We are looking for the perfect balance of lactic acid tang and acetic acid punch. This is a high-stakes game of hydration management and thermal kinetics. Put down the pre-sliced supermarket sponge and prepare to audit your fermentation process. We are going deep into the grain, analyzing every air pocket for signs of structural weakness. It is time to render your kitchen a laboratory of deliciousness.
THE DATA MATRIX
| Metric | Specification |
|---|---|
| Prep Time | 30 Minutes (Active) |
| Execution Time | 24 – 36 Hours (Total) |
| Yield | 2 Boules |
| Complexity (1-10) | 8 |
| Estimated Cost per Serving | $0.45 |
THE GATHERS
Ingredient Protocol:
- 800g / 6.25 cups Strong Bread Flour (12.5% protein minimum)
- 100g / 0.75 cups Whole Rye Flour
- 680ml / 2.85 cups Filtered Water (Room Temperature)
- 180g / 0.75 cups Active Sourdough Starter (Fed 6 hours prior)
- 20g / 1.25 tbsp Fine Sea Salt
Section A: Ingredient Quality Audit:
The most common failure in a Sourdough Crumb Audit is low-protein flour. If your flour lacks the "muscle" to hold gas, your loaf will pancake. Ensure you are using flour with at least 12.5% protein. If your dough feels soupy, your water might be too chlorinated; this kills the microbial activity. Use filtered water to protect your yeast colony. If your starter is sluggish, perform a "booster feed" at a 1:1:1 ratio (starter:flour:water) and keep it at 78 degrees Fahrenheit to infuse it with vigor.
THE MASTERCLASS
1. The Autolyse Phase
Mix your flour and water until no dry clumps remain. Let this sit for one hour before adding your starter or salt. This allows the enzymes to begin breaking down starches into sugars, making them accessible for the yeast.
Pro Tip: Use a digital scale for every measurement. Volumetric measuring is for amateurs; weight is the only way to ensure consistent hydration levels and repeatable results.
2. Microbial Inoculation
Add your active starter and salt to the autolyzed dough. Use the "pincer method" to squeeze the starter into the mass. You are essentially seeding your gluten network with the biological agents required for gas production.
Pro Tip: Use a bench scraper to keep your work surface clean. This tool allows you to manipulate high-hydration dough without adding excess flour, which would ruin the calculated hydration percentage.
3. Bulk Fermentation and Aeration
Perform four sets of "stretch and folds" every 30 minutes. This builds tension and organizes the gluten strands into a cohesive web. You want to aerate the dough gently without popping the precious gas bubbles already forming.
Pro Tip: Watch for "jiggle." A properly fermented dough should wobble like a bowl of jelly when shaken. This indicates that the internal gas pressure is high enough to support the structure.
4. Cold Proofing for Flavor
Shape your boules and place them in bannetons. Transfer them to the refrigerator for 12 to 24 hours. This cold environment slows down the yeast but allows the lactobacillus to produce complex acids, giving you that piquant sourdough tang.
Pro Tip: A cold dough is easier to score. Use a lame (a dedicated razor tool) to create a deep "ear." This provides a controlled release valve for steam during the initial oven spring.
5. The Thermal Shock
Preheat a Dutch oven to 500 degrees Fahrenheit. Carefully drop the dough in and cover. The trapped steam will keep the surface supple, allowing the loaf to expand fully before the crust sets.
Pro Tip: The saucier or a small spray bottle can be used to add an extra spritz of water into the pot. This creates a more viscous surface tension on the dough, leading to a shinier, blistered crust.
Section B: Prep & Timing Fault-Lines:
Timing is the silent killer of the Sourdough Crumb Audit. If you cut the bulk fermentation short, you get "fool's crumb," which is large holes surrounded by dense, gummy dough. If you over-proof, the gluten degrades and the loaf collapses. Use a transparent container for bulk fermentation so you can visually track the volume increase. Aim for a 50% rise before moving to the cold proof.
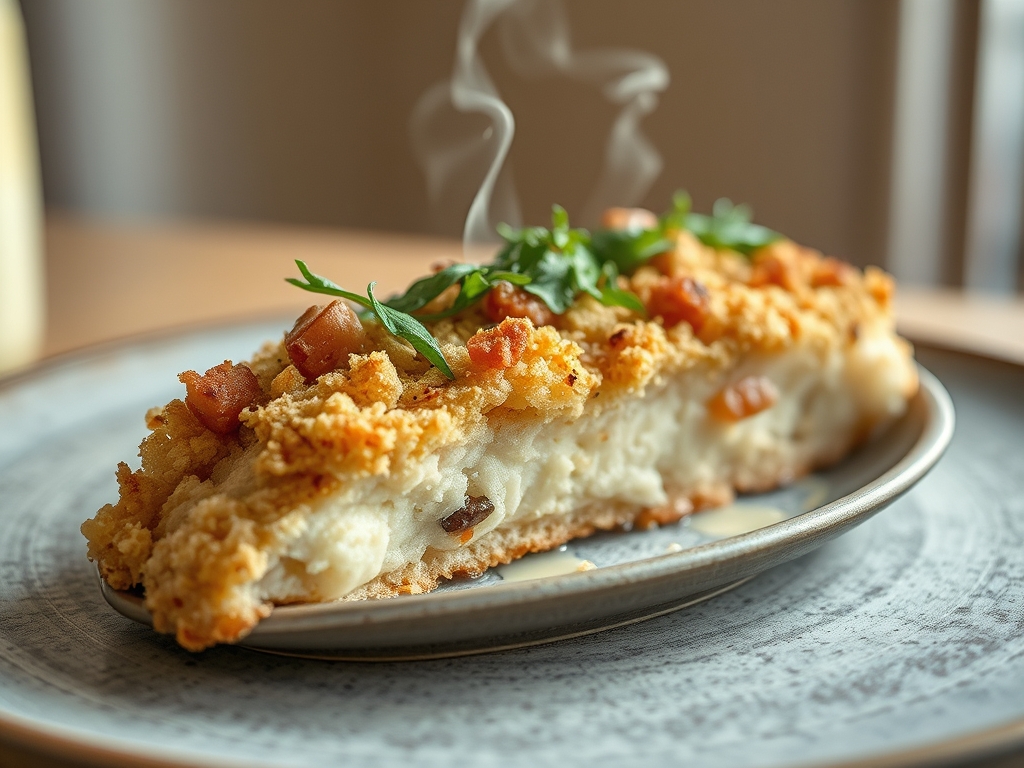
THE VISUAL SPECTRUM
Section C: Thermal & Visual Troubleshooting:
Referencing the Masterclass photo, look for the "shimmer" in the large holes. This indicates proper starch gelatinization. If your crumb is dull and opaque, your oven temperature was likely too low. If the bottom of the loaf is burnt while the top is pale, place a baking sheet on the rack below your Dutch oven to deflect direct heat. Uneven browning usually points to poor steam distribution. Ensure your lid is tight; if it leaks, the crust will be matte and tough rather than glossy and crisp.
THE DEEP DIVE
- Macro Nutrition Profile: Sourdough is a low-glycemic bread. The long fermentation process breaks down much of the gluten and phytic acid, making the nutrients more bioavailable. Each slice typically contains 4g of protein and 2g of fiber.
- Dietary Swaps: For a vegan-friendly boost, ensure your flour is unbleached and organic. For a "Keto-adjacent" version, replace 20% of the flour with almond flour, though be warned: this will drastically alter the structural integrity and crumb audit results.
- Meal Prep & Reheating Science: To maintain the molecular structure, never microwave sourdough. This turns the starch into a rubbery mess. Instead, toast it or reheat it in a 350-degree oven for five minutes to re-crisp the crust while keeping the interior moist.
THE KITCHEN TABLE
Why is my sourdough crumb gummy?
Gummy crumb usually indicates under-baking or cutting the bread while it is still hot. The internal structure needs to set as it cools. Wait at least two hours before auditing the interior.
How do I get bigger holes in my bread?
Increase your hydration levels and handle the dough more gently during the final shaping. You want to preserve the large gas pockets created by the microbes during the bulk fermentation phase.
My bread didn't rise in the oven. What happened?
This is "dead on arrival" syndrome. Either your starter was too weak, or you over-proofed the dough until the gluten network gave up. Audit your starter's activity before your next attempt.
Can I use tap water for my sourdough?
Chlorine and chloramine in tap water can inhibit yeast growth. If you must use tap, let it sit out overnight to allow the gases to dissipate before mixing your dough.
What is the best way to store sourdough?
Store it cut-side down on a wooden board for the first 24 hours. After that, wrap it in a linen bag. Avoid plastic, as it traps moisture and ruins the crust.

