
The scent of scorched ghee hitting a cast-iron surface is not just a culinary event; it is a chemical declaration of war against the mundane. We are diving deep into the structural integrity of the Paratha Layering Study, where the difference between a leaden puck and a shatteringly crisp masterpiece lies in the micron-level management of lipids. This is not mere cooking. This is an architectural audit of dough tension and fat distribution. We are looking for that specific, ethereal moment where the steam trapped between gluten sheets forces an expansion so violent it creates permanent voids. These voids are the hallmark of a successful lamination. When you pull a finished disc apart, it should unfurl like an ancient, buttery scroll. If your layers are fusing into a singular, gummy mass, your infrastructure has failed. We are here to recalibrate your technique, ensuring every fold serves a purpose and every gram of fat is leveraged for maximum mechanical leavening. Prepare your bench scrapers; we are about to re-engineer the flatbread.
THE DATA MATRIX
| Metric | Specification |
|---|---|
| Prep Time | 45 Minutes (includes resting) |
| Execution Time | 20 Minutes |
| Yield | 6 Large Laminated Discs |
| Complexity (1-10) | 7 |
| Estimated Cost per Serving | $0.45 |
THE GATHERS
Ingredient Protocol:
- 500g / 4 cups Durum Wheat Flour (Atta)
- 300ml / 1.25 cups Filtered Water (Room Temperature)
- 10g / 2 tsp Fine Sea Salt
- 60ml / 4 tbsp Clarified Butter (Ghee) for the dough
- 100ml / 0.4 cup Clarified Butter (Ghee) for lamination
- 50g / 0.4 cup Extra Flour for dusting
Section A: Ingredient Quality Audit:
The primary failure point in any Paratha Layering Study is the protein content of the flour. If your flour is too weak, the gluten network will collapse under the weight of the lipids. If it is too strong, the bread will be rubbery. Use a high-quality durum wheat with at least 12 percent protein. If your dough feels overly resistant, infuse the water with a touch of warmth to relax the disulfide bonds. Another critical audit point is the ghee. If your lipid source contains too much water, it will hydrate the flour during the folding process, causing the layers to fuse. Always use clarified butter or high-smoke-point oils to ensure the fat stays separate from the dough matrix.
THE MASTERCLASS
1. Hydration and Autolysis
Combine your flour and salt in a large stainless steel bowl. Slowly introduce the water while mixing with a stiff spatula. Once a shaggy mass forms, stop. Let the dough rest for 15 minutes. This allows for full hydration of the starch granules without overworking the gluten.
Pro Tip: Use a digital scale for the water. Volumetric measurements are notoriously inaccurate for flour hydration; even a 5 percent variance can ruin the elasticity required for thin rolling.
2. The Mechanical Knead
Transfer the dough to a clean surface. Knead for 8 to 10 minutes until the surface is smooth and "tacky" but not sticky. The dough should pass the windowpane test, meaning you can stretch a small piece thin enough to see light through it without it tearing.
Pro Tip: Use a bench scraper to keep your workspace clean. This tool is essential for managing high-hydration doughs and ensuring no dried bits of flour are folded back into the primary mass.
3. Lipid Application and Pleating
Divide the dough into six equal balls. Roll one ball into a thin, translucent circle. Brush a generous layer of viscous ghee across the entire surface and sprinkle a light dusting of flour over the fat. This flour acts as a physical barrier, preventing the layers from re-bonding.
Pro Tip: Fold the dough like a paper fan (accordion style). This creates the vertical stacking necessary for the "Lachha" or layered effect. Using a saucier to keep your ghee warm ensures it spreads evenly without tearing the delicate dough.
4. The Coil and Rest
Roll the pleated strip into a tight spiral, tucking the end underneath. Cover these coils with a damp cloth and let them rest for at least 20 minutes. This is non-negotiable. The gluten must relax, or the dough will shrink back when you try to roll it out for the final cook.
Pro Tip: Measure the internal temperature of your kitchen. If it is over 80 degrees Fahrenheit, rest your coils in the refrigerator to prevent the ghee from melting into the dough fibers.
5. Thermal Execution
Roll the coil out gently into a 7-inch disc. Place it on a preheated cast-iron skillet over medium-high heat. Cook for 30 seconds until small bubbles appear, then flip. Apply a teaspoon of ghee to the cooked side and flip again, pressing down with a spatula to encourage steam pockets.
Pro Tip: Use an infrared thermometer to ensure your pan is between 375 and 400 degrees Fahrenheit. If the pan is too cool, the bread will dry out; if it is too hot, the exterior will char before the inner layers render their fat.
Section B: Prep & Timing Fault-Lines:
The most common human error is rushing the rest periods. If the dough is "snapping back" during the final rolling phase, you are fighting the gluten. Stop immediately and give it 10 more minutes. Additionally, temperature control of the ghee is vital. If the ghee is too hot when applied to the raw dough, it will cook the flour prematurely, destroying the lamination. It should be the consistency of soft butter or a thick syrup.
THE VISUAL SPECTRUM
Section C: Thermal & Visual Troubleshooting:
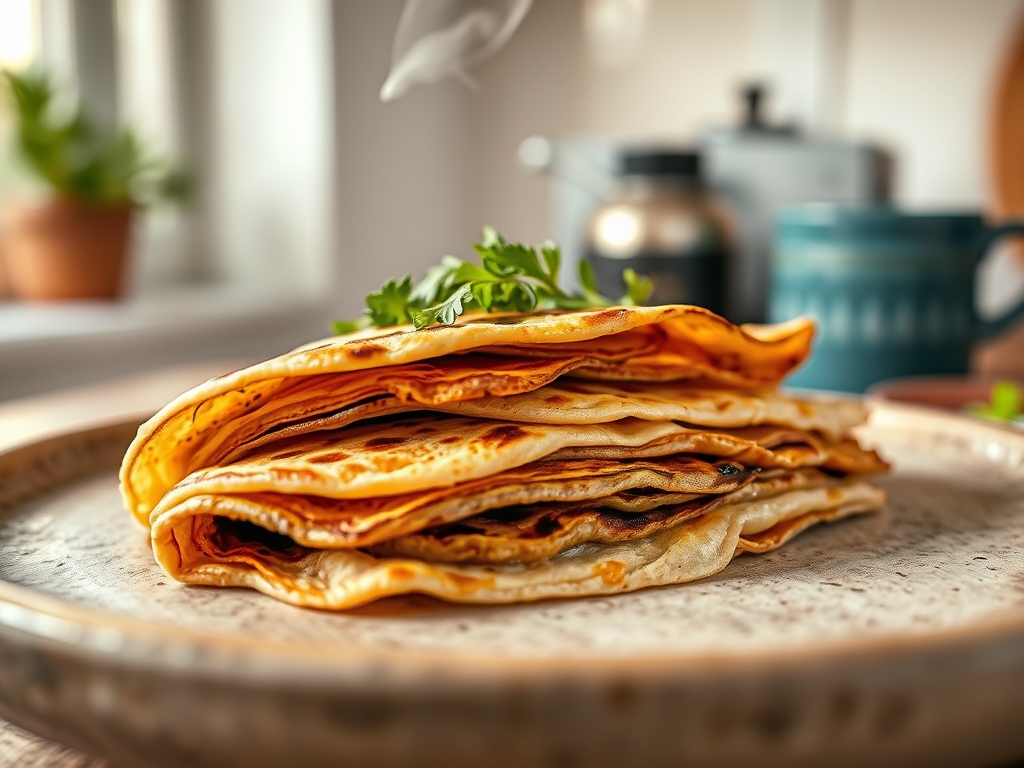
In the Masterclass photo above, notice the distinct golden-brown concentric circles. This is the result of the Maillard reaction occurring on the ridges of the pleats. If your paratha looks uniform and pale, you have not used enough fat or your pan temperature was too low. If the layers are not separating, you likely pressed too hard during the final rolling stage, effectively "welding" the laminations together. A perfect paratha should look like a topographical map with high peaks of crispy, browned dough and deep valleys of soft, steamed bread. To fix dull colors, ensure you are using a fat with a high smoke point; this allows for a longer sear time without the acridity of burnt solids.
THE DEEP DIVE
Macro Nutrition Profile:
Each serving (one paratha) contains approximately 320 calories. The breakdown is roughly 42g of carbohydrates, 6g of protein, and 15g of fats. While high in lipids, these fats are essential for the structural integrity and mouthfeel of the bread.
Dietary Swaps:
- Vegan: Replace ghee with a high-quality avocado oil or a solidified coconut oil. The coconut oil provides the necessary saturated fat to mimic the "shortening" effect of ghee.
- Keto: This is difficult given the reliance on wheat, but almond flour and xantham gum can be used to create a "fathead" style dough that mimics the layering, though it will lack the gluten-snap.
- GF: Use a high-protein gluten-free blend and add 10g of psyllium husk to provide the elasticity required for pleating.
Meal Prep & Reheating Science:
To maintain molecular structure, parathas should be under-cooked slightly if intended for later use. Freeze them with parchment paper between each layer. When reheating, go directly from freezer to a hot pan. This rapid temperature change creates a secondary steam expansion, reviving the crispy texture that microwave heating would otherwise turn into a soggy mess.
THE KITCHEN TABLE
Why is my paratha chewy instead of crispy?
This usually indicates over-kneading or a lack of sufficient fat between the layers. If the gluten network is too dense and not interrupted by lipids, it becomes a single, tough sheet rather than multiple delicate flakes.
Can I use regular butter instead of ghee?
Regular butter contains water and milk solids. The water will hydrate the flour and ruin the lamination; the milk solids will burn at the high temperatures required for a proper sear. Always use clarified butter.
My dough keeps tearing when I roll it. Help!
Your dough is likely under-hydrated or hasn't rested long enough. Ensure you are using the dual-unit measurements provided. If it still tears, let it rest for another 15 minutes to allow the gluten to relax.
How do I get those "shattered" flakes?
After cooking, place the paratha between your palms and give it a quick, sharp crush. This mechanical shock breaks the brittle outer layers and separates the internal lamination, creating the classic "flaky" look.

