
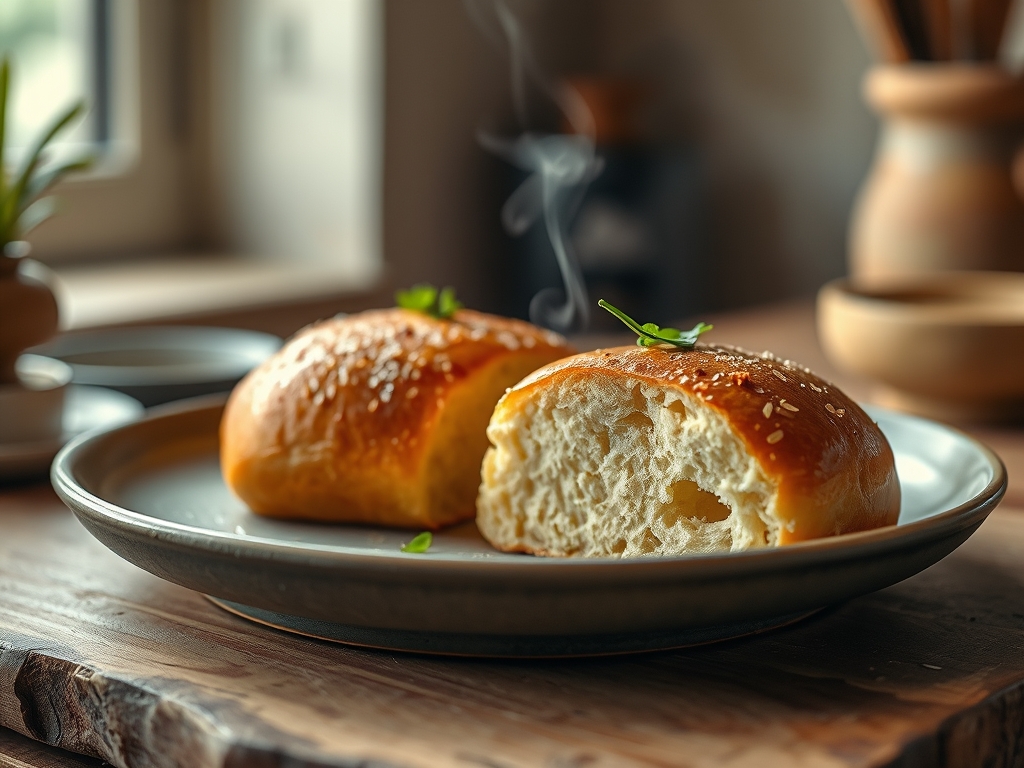
Imagine a cloud that decided to become a structural engineer. That is the initial sensory impact of authentic Japanese Milk Bread. We are not discussing the dry; crumbly husks of supermarket loaves. This is a high-performance carbohydrate matrix engineered for maximum tensile strength and impossible softness. When you pull a fresh loaf apart; the crumb does not tear so much as it unspools in long; silky ribbons of hydrated gluten. The aroma is a concentrated blast of toasted lactose and sweet yeast; a piquant olfactory signature that demands immediate consumption. This is the pinnacle of the baker's craft; where starch and fat perform a delicate ballet to defy the laws of staling. We are diving deep into the architecture of the crumb; utilizing the legendary Tangzhong method to lock moisture into the cellular walls of the dough. If you want a bread that remains pillow-soft for five days without the use of industrial preservatives; you have come to the right audit. Prepare to recalibrate your expectations of what flour and water can achieve when pushed to their thermal limits.
THE DATA MATRIX
| Metric | Specification |
|---|---|
| Prep Time | 45 Minutes (Active) |
| Execution Time | 3.5 Hours (Total) |
| Yield | 1 Standard Pullman Loaf (9x4x4) |
| Complexity (1-10) | 7 (High Hydration Management) |
| Estimated Cost per Serving | $0.45 USD |
THE GATHERS
Ingredient Protocol:
- The Tangzhong Starter:
- 20g / 3 tbsp Bread Flour (High Protein)
- 100ml / 0.4 cup Whole Milk (3.5% Fat)
- The Main Dough Body:
- 350g / 2.75 cups Bread Flour (Minimum 12.5% protein)
- 55g / 0.25 cup Granulated Sugar
- 7g / 2.25 tsp Instant Yeast
- 7g / 1.25 tsp Fine Sea Salt
- 125ml / 0.5 cup Whole Milk (Room Temperature)
- 1 Large Egg (Approx. 50g)
- 50g / 3.5 tbsp Unsalted Butter (Softened/Plasticized)
- The Glaze:
- 15ml / 1 tbsp Heavy Cream
- 1 Egg Yolk
Section A: Ingredient Quality Audit:
The primary failure point in Japanese Milk Bread is the use of All-Purpose flour. This recipe requires a high protein content to support the weight of the milk and butter; lower protein counts will result in a loaf that collapses under its own structural gravity. If your flour is older than six months; its enzymatic activity has likely plummeted. To fix this; add 5g of vital wheat gluten to your dry mix. Another critical audit item is the yeast. If your yeast is sluggish; do not proceed. Perform a bloom test in warm milk; if it does not aerate and foam within ten minutes; discard it. Finally; ensure your butter is high-quality European style with at least 82% butterfat. Cheap butter contains too much water; which will throw off your hydration calculations and result in a gummy crumb rather than a silky one.
THE MASTERCLASS
Step-by-Step Execution:
1. The Tangzhong Gelatinization
In a small saucier; whisk together the 20g of flour and 100ml of milk until no lumps remain. Place over medium-low heat and whisk constantly. You are looking for the exact moment the mixture transforms into a viscous; translucent paste. This occurs at 65 degrees Celsius (149 degrees Fahrenheit). Remove from heat immediately and transfer to a small bowl to cool.
Pro Tip: This process pre-gelatinizes the starches; allowing them to absorb more liquid than they could at room temperature. This is the secret to the bread's longevity and moisture.
2. The Primary Integration
In the bowl of a stand mixer; combine the bread flour; sugar; salt; and yeast. Using a digital scale is non-negotiable here; volume measurements are too imprecise for this level of chemistry. Add the cooled Tangzhong; the room-temperature milk; and the egg. Use the dough hook attachment on low speed until a shaggy mass forms.
Pro Tip: Ensure your milk is not cold from the fridge. Cold liquids will inhibit yeast activity and extend your proofing times by hours.
3. The Intensive Knead & Fat Emulsification
Increase the mixer speed to medium. Once the dough begins to clear the sides of the bowl; add the softened butter one tablespoon at a time. Continue to knead for 10 to 12 minutes. The dough should become incredibly smooth; elastic; and slightly tacky but not sticky. Perform the windowpane test; you should be able to stretch a small piece of dough thin enough to see light through it without it tearing.
Pro Tip: The late addition of fat allows the gluten strands to form fully before they are coated in lipids; which would otherwise shorten the strands and reduce the height of the loaf.
4. The Bulk Fermentation
Shape the dough into a smooth ball and place it in a lightly greased bowl. Cover with a damp cloth and let it rise in a warm; draft-free environment until doubled in size. This usually takes 60 to 90 minutes depending on your ambient kitchen temperature.
Pro Tip: Use a proofer box or the "bread proof" setting on your oven to maintain a consistent 27 degrees Celsius (80 degrees Fahrenheit) for optimal yeast metabolism.
5. The Structural Shaping
Degas the dough gently by pressing down on it. Use a bench scraper to divide the dough into three equal portions. Roll each portion into a rectangle; fold the sides inward; and roll it up like a cigar. Place the three rolls side-by-side in a greased Pullman pan.
Pro Tip: Tight tension during the rolling phase is what creates the signature "shred" of the crumb. If the rolls are too loose; the bread will have large; uneven air pockets.
6. The Final Proof & Thermal Execution
Cover the pan and let the dough rise until it reaches about 1 inch below the rim of the pan. Preheat your oven to 175 degrees Celsius (350 degrees Fahrenheit). Brush the top with the cream and egg yolk mixture. Bake for 30 to 35 minutes until the internal temperature reaches 90 degrees Celsius (195 degrees Fahrenheit).
Pro Tip: Brushing with heavy cream instead of just water provides the proteins necessary for a deep Maillard reaction; resulting in that iconic golden-brown mahogany crust.
Section B: Prep & Timing Fault-Lines:
The most common human error is rushing the cooling process. If you slice into this bread while it is still hot; the internal steam will escape instantly; causing the starch structure to collapse and become gummy. You must wait at least 90 minutes. Another fault-line is over-proofing. If the dough rises too high in the pan before entering the oven; the yeast will have exhausted its fuel; leading to a "pock-marked" top or a total collapse during the bake. Monitor the volume; not the clock.
THE VISUAL SPECTRUM
Section C: Thermal & Visual Troubleshooting:
Look closely at the Masterclass photo. The top should have a uniform; semi-glossy sheen with a deep amber hue. If your loaf is pale; your oven temperature is likely too low or you skipped the egg wash. If the sides of the loaf are caving in after baking; this is a "waisting" effect caused by under-baking or removing the bread from the pan too late. The bread should be removed from the tin within two minutes of exiting the oven to prevent steam from softening the side crusts. If you see "shredded" tears on the sides; your shaping was too tight; if the top is flat; you likely under-proofed the final stage.
THE DEEP DIVE
Macro Nutrition Profile:
Per serving (approx. 50g slice): 160 Calories; 5g Protein; 24g Carbohydrates; 5g Fat. This is a high-energy; enriched bread designed for satiety and texture.
Dietary Swaps:
- Vegan: Replace milk with oat milk; butter with a high-fat vegan block; and the egg with 50g of silken tofu blended until smooth.
- Keto/GF: This specific Tangzhong architecture relies entirely on wheat protein (gluten). While GF versions exist using xanthan gum and rice flour; they will not achieve the "ribbon" tear of the original.
Meal Prep & Reheating Science:
To maintain the molecular structure; store the bread in an airtight container at room temperature. Never refrigerate; as this accelerates starch retrogradation (staling). To revive; toast lightly or microwave for 10 seconds with a cup of water to re-hydrate the starch molecules.
THE KITCHEN TABLE
Why is my bread not as soft as the bakery?
You likely under-kneaded or used low-protein flour. The "windowpane" stage is critical for trapping the gases that create softness. Ensure you are using a digital scale for precision; as extra flour will toughen the crumb significantly.
Can I make this without a stand mixer?
Yes; but be prepared for a workout. The dough is high-hydration and very sticky until the gluten develops. Use a bench scraper to manage the dough on the counter and avoid adding excess flour during the manual kneading process.
My bread has a sour smell. What happened?
This indicates over-proofing. If the yeast ferments for too long; it produces excess ethanol and organic acids. Shorten your rise time or find a slightly cooler spot in your kitchen to slow down the biological activity of the yeast.
How do I get that perfectly square shape?
You must use a Pullman loaf tin with a sliding lid. Grease the lid well and slide it on before the final proof is complete. The dough will expand against the lid; creating a perfectly geometric; compressed crumb structure.

