
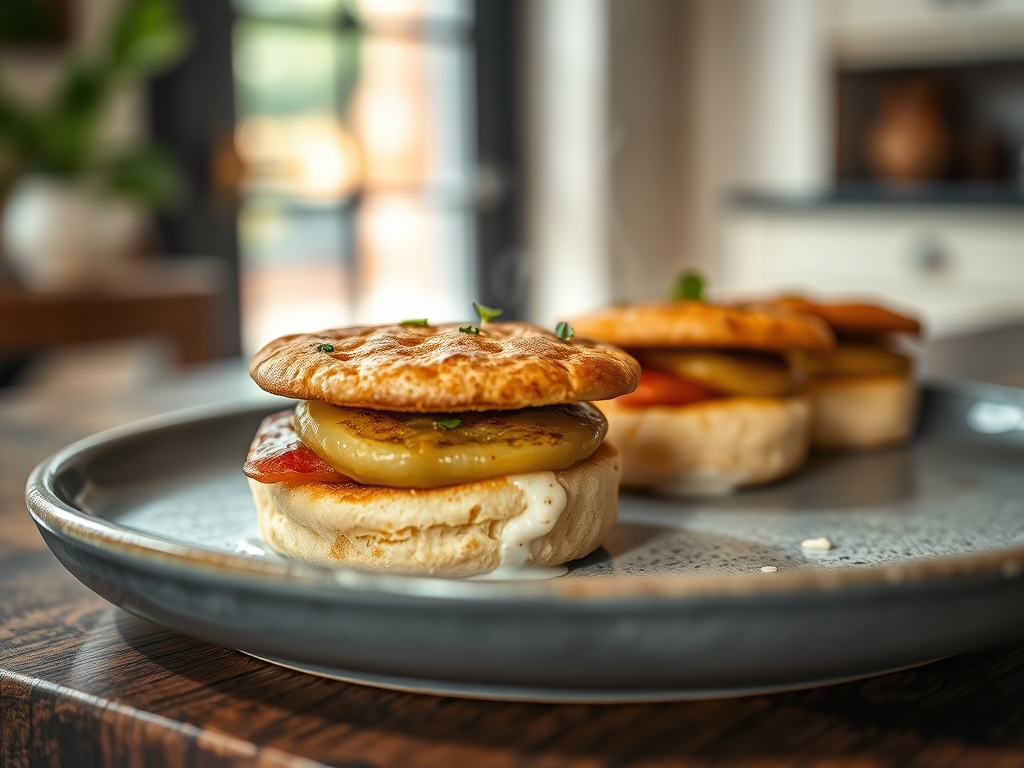
Listen to the sound of a serrated blade tearing through a griddled exterior. It is not a clean snap; it is a jagged, structural collapse. You are looking for the architectural holy grail of breakfast: English Muffin Nooks. These are not merely holes. They are pressurized carbon dioxide pockets captured within a high-hydration matrix, frozen in time by the sudden application of conductive heat. When you pull those two halves apart, you should see a lunar landscape of craters designed for one specific purpose: the total sequestration of molten butter. Most home cooks produce dense, bready pucks that resemble hockey equipment more than high-end pastry. That ends today. We are moving beyond the realm of "bread" and into the territory of structural engineering. We are manipulating gluten elasticity and yeast fermentation to create a crumb so open it defies gravity. This is about the precise intersection of a viscous batter and a hot cast iron surface. Prepare to audit your technique, optimize your thermal output, and finally achieve the cavernous interior that makes the store-bought variety look like cardboard.
THE DATA MATRIX
| Metric | Specification |
|---|---|
| Prep Time | 20 Minutes (Active) / 14 Hours (Fermentation) |
| Execution Time | 15 Minutes |
| Yield | 10 to 12 Units |
| Complexity (1-10) | 7 |
| Estimated Cost per Serving | $0.28 |
THE GATHERS
Ingredient Protocol:
- 500g / 4 cups All-Purpose Flour (High protein preferred)
- 350ml / 1.5 cups Whole Milk (Warmed to 100F)
- 50g / 3.5 tbsp Unsalted Butter (Melted)
- 10g / 2 tsp Fine Sea Salt
- 7g / 2.25 tsp Active Dry Yeast
- 15g / 1 tbsp Honey or Granulated Sugar
- 50g / 0.5 cup Cornmeal (For dusting)
Section A: Ingredient Quality Audit:
If your yeast is sluggish, your English Muffin Nooks will be non-existent. Perform a bloom test: if the mixture does not aerate and foam within ten minutes, discard it. Sub-par flour with low protein content will fail to trap gas; the cell walls will rupture, leading to a flat, gummy interior. If your milk is too hot, you will kill the yeast; if it is too cold, the fermentation lag will allow enzymes to break down the gluten structure prematurely. Use a digital thermometer to verify your liquids are between 95F and 105F. If your butter is salted, reduce the added sea salt by 25% to prevent over-seasoning and yeast inhibition.
THE MASTERCLASS
1. The High-Hydration Integration
Combine your warmed milk, honey, and yeast in a small saucier or bowl. Let it sit until foamy. In a large basin, whisk your flour and salt. Pour the liquid gold into the dry mass and stir until a shaggy, viscous dough forms. This is not a standard bread dough; it should feel sticky and almost unmanageable.
Pro Tip: High hydration is the secret to the nook. A wetter dough allows carbon dioxide to expand more easily before the proteins set. Use a digital scale for 100% accuracy; volume measurements are the enemy of consistency.
2. The Cold Fermentation Protocol
Cover the dough and let it rise at room temperature for one hour, then transfer it to the refrigerator for at least 12 hours. This cold retard slows down the yeast, allowing complex organic acids to develop, which infuse the dough with that signature sourdough-adjacent tang.
Pro Tip: Cold dough is significantly easier to handle. Use a bench scraper to manipulate the dough onto a floured surface without deflating the precious gas pockets you have spent all night cultivating.
3. Division and Bench Rest
Gently turn the dough out. Do not kneed it. Use your bench scraper to divide the mass into 80g portions. Shape them into loose rounds and roll them in cornmeal. Let them rest on a parchment-lined sheet for 60 minutes until they look puffy and fragile.
Pro Tip: Over-handling the dough at this stage will "degas" the matrix. You want to preserve every milliliter of carbon dioxide to ensure the final product has the internal architecture required for maximum butter retention.
4. The Conductive Sear
Heat a heavy cast iron skillet over medium-low heat. Do not use oil; the cornmeal provides the non-stick barrier. Place the rounds in the pan. Cover with a lid for the first 4 minutes to create a steam-saturated environment, then flip.
Pro Tip: The lid mimics a professional deck oven. It keeps the surface of the dough moist, allowing for maximum "oven spring" before the crust hardens. This is how you achieve height and internal volume.
5. The Fork-Split Mandate
Once the internal temperature hits 200F, remove them to a wire rack. Wait at least 30 minutes. Use a fork to pierce the perimeter and pry the muffin open. Never use a knife. A knife shears through the structure, sealing the nooks you worked so hard to create.
Pro Tip: The fork-split method preserves the craggy, irregular surface area. This maximizes the Maillard reaction when you eventually toast the interior, creating a contrast between the soft crumb and the crunchy peaks.
Section B: Prep & Timing Fault-Lines:
The most common failure is rushing the second rise. If the dough is not sufficiently proofed before hitting the pan, it will be dense. If the pan is too hot, the exterior will render a burnt crust while the interior remains raw and doughy. If you find the centers are undercooked, lower the heat and extend the time. Use your digital scale to ensure every muffin is the same weight; uneven sizes lead to uneven thermal absorption and a chaotic service.
THE VISUAL SPECTRUM
Section C: Thermal & Visual Troubleshooting:
Referencing the Masterclass photo, your muffins should exhibit a "halo" of pale dough between two deeply browned, flat surfaces. If your muffins are spherical like dinner rolls, your dough was too dry or your heat was too low. If the nooks look like small, uniform bubbles rather than large, cavernous craters, you likely over-kneaded the dough, creating a crumb that is too tight. Dull, matte crusts indicate a lack of moisture during the initial sear; ensure your lid fits tightly to trap the steam. If the cornmeal is turning black, your surface temperature is exceeding 400F; pull the pan off the heat immediately to recalibrate.
THE DEEP DIVE
Macro Nutrition Profile:
Each muffin provides approximately 180 calories, 34g of carbohydrates, 6g of protein, and 3g of fat. The long fermentation process slightly lowers the glycemic index compared to quick-breads, as the yeast consumes a portion of the simple sugars.
Dietary Swaps:
For a vegan iteration, substitute the milk with unsweetened soy milk and the butter with a high-quality vegan block or neutral oil. For a gluten-free version, a high-protein GF flour blend with added xantham gum is required, though the "nook" structure will be significantly more difficult to achieve without gluten elasticity.
Meal Prep & Reheating Science:
These muffins freeze beautifully. To maintain molecular integrity, slice them before freezing. When reheating, go directly from the freezer to the toaster. The rapid sublimation of ice crystals into steam within the toaster helps re-moisturize the interior while the heating elements crisp the exterior.
THE KITCHEN TABLE
Why are my muffins so heavy?
High density usually stems from low hydration or insufficient proofing. Ensure your dough is sticky and let it rise until it feels light and airy. If it feels like a lead weight, it will bake like one.
Can I use a ring mold?
Absolutely. Using stainless steel English Muffin rings will provide a more uniform, professional shape. It prevents the dough from spreading laterally, forcing the carbon dioxide to expand vertically, which can actually enhance the nook development.
Why use cornmeal on the bottom?
Cornmeal acts as a "ball bearing" system. It prevents sticking on the dry cast iron and provides a specific textural crunch that defines the English Muffin experience. It also prevents the flour from burning and tasting bitter.
Is the 12-hour rest mandatory?
Technically, no, but practically, yes. Without the cold ferment, you lose the enzymatic breakdown that creates the flavor and the relaxed gluten state required for those massive, irregular air pockets. Shortcuts lead to mediocre bread.

