
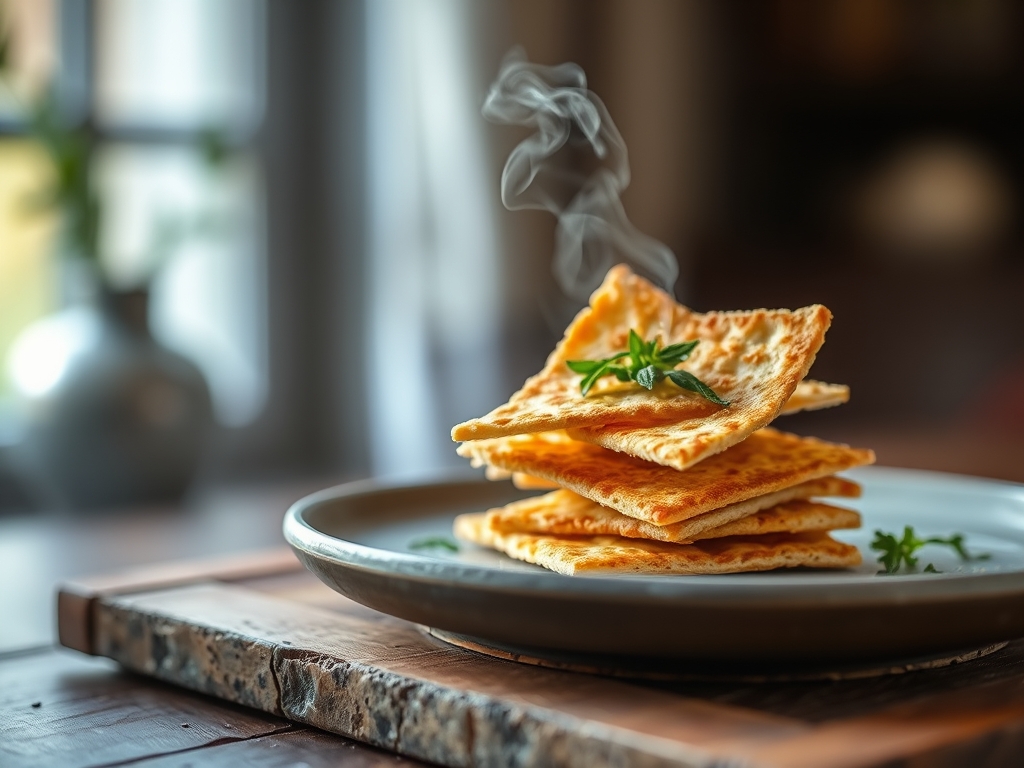
Listen to that sound. It is not just a crunch; it is a structural failure of the highest order. When you achieve the perfect Matzo Cracker Snap, you are witnessing the violent release of energy stored within a dehydrated gluten lattice. This is the gold standard of unleavened engineering. We are not looking for the chewy resilience of a sourdough or the flaky, lipid-heavy crumble of a shortbread. We are hunting for a clean, acoustic fracture that signals total moisture evacuation. To the uninitiated, it is a snack; to the culinary auditor, it is a masterpiece of low-hydration geometry. Achieving this requires more than just heat. It requires a ruthless commitment to rolling thickness and a deep understanding of how starch granules behave when deprived of their usual aqueous environment. We are about to strip away the fluff and focus on the skeletal remains of dough. Prepare your workspace for high-velocity baking. We are going to render every drop of humidity obsolete and leave behind nothing but pure, resonant texture.
THE DATA MATRIX
| Metric | Specification |
|---|---|
| Prep Time | 15 Minutes |
| Execution Time | 12 Minutes |
| Yield | 12 Large Sheets |
| Complexity | 4 / 10 |
| Estimated Cost per Serving | $0.22 |
THE GATHERS
Ingredient Protocol:
- 500g / 4 cups All-Purpose Flour (High protein preferred)
- 235ml / 1 cup Room Temperature Water
- 15ml / 1 tbsp Extra Virgin Olive Oil
- 10g / 2 tsp Fine Sea Salt
- 5g / 1 tsp Flaky Salt (For topical application)
Section A: Ingredient Quality Audit:
The primary failure point in low-hydration dough is the protein content of your flour. If your flour is too "soft" or low in protein, the crackers will be fragile and dusty rather than snapping with authority. Technical Fix: If you only have pastry flour, replace 10 percent of the volume with vital wheat gluten to reinforce the structural integrity. If your water is excessively hard or contains high chlorine levels, it can inhibit the way the flour absorbs moisture. Technical Fix: Use filtered water to ensure a clean flavor profile and consistent hydration. Finally, if your olive oil has oxidized, it will impart a bitter, metallic note that the heat of the oven will only amplify. Always taste your oil before it hits the flour; it should be bright and slightly piquant.
THE MASTERCLASS
1. The Hydration Integration
Combine the flour and sea salt in a large stainless steel bowl. Create a well in the center and pour in the water and olive oil. Use a bench scraper to cut the liquid into the dry ingredients until a shaggy, recalcitrant mass forms. This is not a viscous batter; it should feel dry and slightly difficult to work with.
Pro Tip: Use a digital scale for this step. Volumetric measurements are the enemy of consistency in low-hydration baking. Even a 5 percent variance in water can turn a crisp snap into a leathery chew.
2. The Structural Development
Turn the dough onto a clean surface and knead for exactly five minutes. You are not looking for the windowpane effect here; you simply want to infuse the moisture evenly throughout the starch. The dough should feel dense and stiff. Wrap it tightly in plastic to prevent any evaporation and let it rest for 20 minutes.
Pro Tip: Resting allows the gluten to relax, which is essential for the next stage. Without this rest, the dough will snap back like a rubber band when you try to roll it, preventing you from reaching the necessary thinness.
3. The Compression Phase
Divide the dough into twelve equal portions. Using a heavy rolling pin or a pasta machine, roll each piece until it is translucent. You should be able to see the shadow of your hand through the dough. The thinner the sheet, the more aggressive the Matzo Cracker Snap will be.
Pro Tip: If using a pasta machine, run the dough through the thinnest setting twice. This mechanical compression helps aerate the micro-pockets of air that will expand slightly in the oven, creating the classic blistered topography.
4. The Perforation Protocol
Place the sheets on a parchment-lined baking sheet. Use a docker or a fork to aggressively prick the entire surface of the dough. This prevents the dough from ballooning into a single large bubble and ensures the heat can render the moisture out of the center of the cracker.
Pro Tip: Use a saucier or a small brush to lightly mist the surface with water before adding flaky salt. This creates a localized steam effect that helps the salt crystals adhere without dissolving them into the dough.
5. The Thermal Shock
Slide the trays into an oven preheated to 500 degrees Fahrenheit (260 Celsius). Bake for 3 to 5 minutes, or until the edges are charred and the surface is covered in golden-brown blisters. Watch them like a hawk; at this thickness, the transition from "perfect" to "incinerated" happens in seconds.
Pro Tip: Use a baking stone or a heavy steel plate if available. The intense, direct thermal transfer will cause the dough to "flash bake," locking in the crispness before the interior has a chance to toughen.
Section B: Prep & Timing Fault-Lines:
The most common human error is the "slow roll." If you take too long to roll out the sheets, the dough dries out unevenly, leading to a brittle texture that shatters into dust rather than clean shards. Technical Fix: Work with one piece of dough at a time while keeping the rest strictly covered. Temperature control is also vital. If your kitchen is too hot, the oil may begin to render out of the dough before it hits the oven, leading to a greasy finish. Keep the dough cool until the moment it enters the high-heat environment.
THE VISUAL SPECTRUM
Section C: Thermal & Visual Troubleshooting:
Look at the Masterclass photo. Notice the high-contrast "leopard spotting" on the surface. If your crackers are a uniform, pale tan, your oven temperature was too low or your dough was too thick. This results in a "stale" mouthfeel rather than a snap. If the crackers are curling at the edges but remain soft in the middle, you failed to dock the dough sufficiently. Visual Cue: A perfect cracker should be rigid enough to hold its own weight when held from one corner. If it sags, it requires more time to dehydrate. The color should range from cream to deep mahogany at the very peaks of the blisters.
THE DEEP DIVE
Macro Nutrition Profile
Per serving (one large sheet): 160 Calories, 3g Fat, 28g Carbs, 5g Protein. This is a high-density energy source with minimal lipid interference, making it an ideal vessel for rich dips or cheeses.
Dietary Swaps
- Vegan: Already compliant.
- Keto: Replace wheat flour with a blend of almond flour and xanthan gum (note: the "snap" will be more of a "crumble").
- GF: Use a high-quality 1-to-1 gluten-free flour blend, but increase the water by 10 percent to compensate for the higher fiber absorption.
Meal Prep & Reheating Science
To maintain the molecular structure, store these in an airtight glass container with a silica desiccant pack if possible. If they lose their snap due to humidity, do not microwave them. Re-flash them in a 350-degree oven for 90 seconds to deglaze the surface moisture and restore the acoustic fracture.
THE KITCHEN TABLE
Why is my matzo tough instead of crispy?
You likely over-worked the dough or rolled it too thick. Excess gluten development without sufficient thinning creates a structural density that the oven cannot penetrate. Aim for paper-thin sheets to ensure the heat can evacuate all moisture rapidly.
Can I add herbs to the dough?
Yes, but keep them dry. Fresh herbs release moisture during baking, which can create soft spots. Use dried rosemary or thyme, and grind them finely so they do not puncture the dough during the compression phase.
What is the best way to get even browning?
Rotate your pans halfway through the bake. Most home ovens have significant thermal gradients. A 180-degree rotation ensures that the back-of-oven "hot spots" don't incinerate one side while the front remains undercooked.
Why does my dough keep shrinking back?
The gluten is too tense. Give the dough a "time-out." Cover it and let it rest for another 10 minutes. This allows the protein bonds to relax, making the dough much more cooperative during the rolling process.

