
Listen to the sound of a structural failure that is actually a culinary triumph. It is the sharp, atmospheric hiss of steam escaping a perfectly engineered Pita Bread Pocket as it exits a five hundred degree oven. This is not merely baking; it is a high pressure exercise in thermodynamics and gluten elasticity. When the dough hits the searing floor of the oven, the internal moisture undergoes a phase change from liquid to gas. This rapid vapor pressure forces the top and bottom layers of the dough to separate, creating a hollow, steam filled cavity. If your bread resembles a dense, lifeless disc of cardboard rather than a buoyant, pillowy vessel, your infrastructure has failed. We are here to audit your process, from the hydration levels of your flour to the thermal mass of your baking surface. We will transform your kitchen into a high output laboratory where the goal is a golden brown exterior and a pristine, spacious interior. Strap in; we are about to optimize your dough.
THE DATA MATRIX
| Metric | Specification |
|---|---|
| Prep Time | 20 Minutes (Active) / 90 Minutes (Fermentation) |
| Execution Time | 3 Minutes per Batch |
| Yield | 8 Structural Pockets |
| Complexity | 6/10 (Requires Heat Management) |
| Estimated Cost per Serving | $0.22 USD |
THE GATHERS
Ingredient Protocol:
- 500g / 3.75 cups High Protein Bread Flour (12.7% protein preferred)
- 325ml / 1.3 cups Filtered Water (Warmed to 105F/40C)
- 10g / 2 tsp Fine Sea Salt
- 7g / 2.25 tsp Active Dry Yeast
- 15ml / 1 tbsp Extra Virgin Olive Oil
- 5g / 1 tsp Granulated Sugar (To feed the biological engine)
Section A: Ingredient Quality Audit:
Sub-par raw materials are the primary cause of structural collapse in the Pita Bread Pocket. If you are using All-Purpose flour with a low protein content, the gluten network will be too weak to contain the rapid vapor pressure, resulting in a "leaky" pocket that fails to inflate. Fix: Switch to a high protein bread flour or add 10g of vital wheat gluten to your mix. If your yeast is sluggish, the dough will not aerate properly during the proofing stage. Fix: Always bloom your yeast in sugar water; if you do not see a frothy, viscous head within five minutes, discard and start over. Finally, hard tap water with high chlorine levels can inhibit yeast activity. Fix: Use filtered or spring water to ensure the biological fermentation remains unhindered.
THE MASTERCLASS
Step 1: The Hydration and Autolyse
Combine your flour, yeast, sugar, and water in the bowl of a stand mixer. Mix on low speed until a shaggy mass forms, then let it rest for ten minutes. This allows the flour to fully hydrate and begins the gluten development without physical labor.
Pro Tip: Use a digital scale for this step. Volumetric measurements are notoriously inaccurate; a "cup" of flour can vary by twenty percent depending on how it is packed, which will throw off your hydration ratio and ruin the dough consistency.
Step 2: Mechanical Kneading and Oil Infusion
Add the salt and olive oil. Increase the mixer speed to medium and knead for seven to eight minutes. The dough should become smooth, elastic, and clear the sides of the bowl. It should pass the "windowpane test," where a small piece can be stretched thin enough to see light through it without tearing.
Pro Tip: Use a bench scraper to manage the dough during the transfer to a proofing bowl. This tool maintains the integrity of the gluten sheets you just built and prevents the dough from sticking to your workspace.
Step 3: Primary Fermentation
Place the dough in a lightly oiled bowl and cover with a damp cloth. Allow it to rise in a warm environment (75F to 80F) until it has doubled in size. This is where flavor develops as the yeast consumes sugars and releases carbon dioxide.
Pro Tip: An infrared thermometer is an essential tool here. Check the internal temperature of your dough; if it is too cold, the fermentation will stall. If it is over 90F, the yeast may produce off-flavors that taste like alcohol.
Step 4: Division and Tensioning
Deflate the dough and divide it into eight equal portions (approximately 100g each). Roll each portion into a tight ball by tensioning the surface against the counter. Let these rests for twenty minutes to relax the gluten.
Pro Tip: Tension is the key to an even puff. By creating a smooth, taut skin on the dough ball, you ensure that the expansion during baking is uniform rather than lopsided.
Step 5: The High Heat Launch
Preheat your oven to 500F (260C) with a pizza stone or heavy baking sheet inside for at least forty five minutes. Roll each dough ball into a six inch circle. Launch the dough directly onto the hot surface. Watch as the steam causes the bread to balloon within two minutes.
Pro Tip: Use a saucier or a small spray bottle to mist the oven walls with water just before closing the door. This creates a burst of steam that keeps the crust supple, allowing for maximum expansion before the exterior sets.
Section B: Prep & Timing Fault-Lines:
Timing is the most common point of failure. If you roll out all your pitas at once and let them sit, the bottom side will become wetter than the top, leading to an uneven puff. Fix: Roll and bake in a staggered sequence. If your oven is not fully preheated, the "thermal shock" required to turn water into steam will not occur fast enough, leaving you with a flat cracker. Fix: Use an oven thermometer to verify that your stone has reached the target temperature; do not trust the digital display on your appliance.
THE VISUAL SPECTRUM
Section C: Thermal & Visual Troubleshooting:
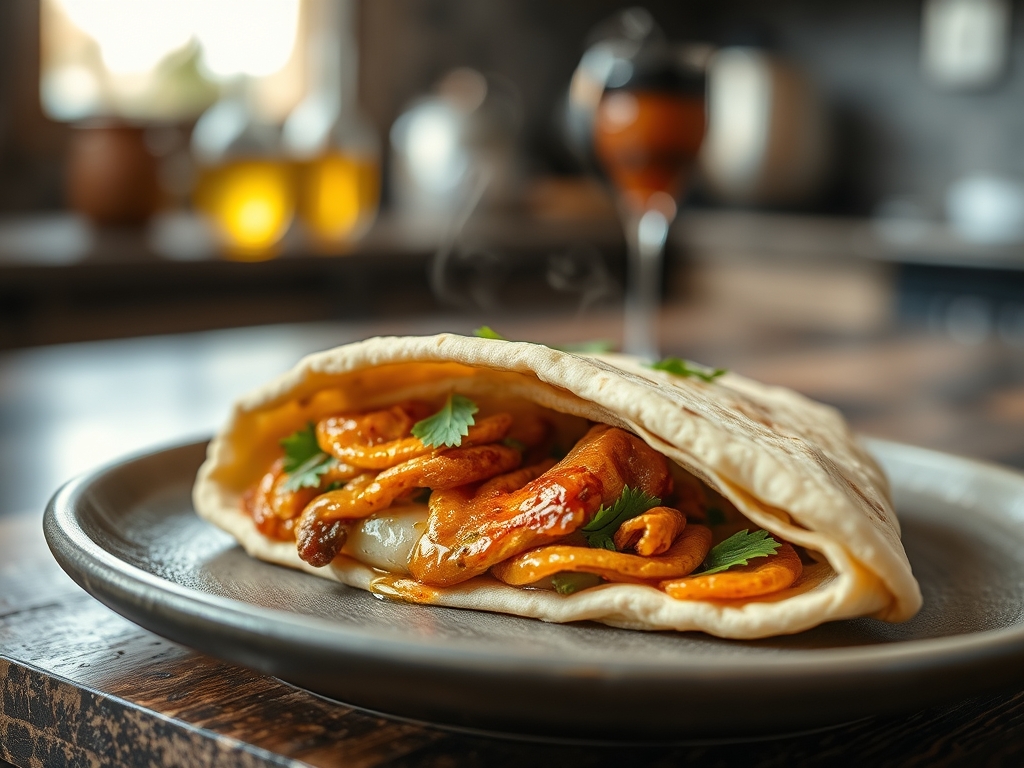
The Masterclass photo displays a Pita Bread Pocket with localized "leopard spotting" (dark charred circles) and a pale, cream colored background. If your pita is a uniform, dull brown, you have likely baked it at too low a temperature for too long, resulting in a dry, brittle texture. Fix: Crank the heat and shorten the duration. If your pita has no browning at all, your dough may lack enough residual sugar to undergo the Maillard reaction. Fix: Ensure you are using the specified amount of sugar in the dough protocol. If the pocket is lopsided or has a "bald spot" where it didn't puff, your rolling pin pressure was uneven. Fix: Roll from the center outward, rotating the dough frequently to maintain a consistent thickness.
THE DEEP DIVE
Macro Nutrition Profile:
A single 100g Pita Bread Pocket provides approximately 250 calories, 8g of protein, 48g of carbohydrates, and 3g of fat. It is a high glycemic energy source, perfect for fueling intense physical activity.
Dietary Swaps:
- Vegan: The standard protocol is already vegan.
- Keto: Substitute wheat flour with a blend of almond flour, vital wheat gluten, and xanthan gum (though the "puff" will be less dramatic).
- GF: Use a high quality 1:1 gluten free flour blend with added psyllium husk to provide the structural elasticity needed to hold steam.
Meal Prep & Reheating Science:
To maintain the molecular structure, store pitas in an airtight bag once cooled to prevent starch retrogradation (staling). To reheat, wrap in a damp paper towel and microwave for fifteen seconds, or toss directly over a gas flame for thirty seconds to render the exterior crisp while keeping the interior soft.
THE KITCHEN TABLE
Why didn't my pita puff?
The most likely culprit is a low oven temperature or a hole in the dough. Even a tiny tear allows steam to escape, preventing the pressure needed to separate the layers. Ensure your baking surface is screaming hot.
Can I make the dough in advance?
Absolutely. A cold fermentation in the refrigerator for twenty four hours will actually improve the flavor profile and make the dough easier to handle. Just bring it to room temperature before rolling.
How do I get that piquant charred flavor?
Finish the baked pita directly over a gas burner for five seconds per side. This flash searing adds a smoky complexity and mimics the high heat of a traditional wood fired oven.
My pita is too crunchy; how do I soften it?
Immediately after baking, stack the hot pitas and wrap them in a clean kitchen towel. The residual steam trapped in the towel will soften the crusts, making them pliable enough to fold without breaking.

