
Listen to that sound. It is not the soft crumble of a shortbread or the greasy snap of a butter cracker; it is the high-velocity fracture of a structural masterpiece. We are entering the realm of the Water Cracker Audit. This is the ultimate test of culinary infrastructure. You are working with a low-lipid environment where there is no fat to hide behind. In this arena, your technical execution is the only thing standing between a gourmet canvas and a piece of flavorless drywall. We are looking for a surface tension so tight it rings when tapped and a crumb structure so fine it vaporizes upon contact with the palate. This is about the physics of hydration and the brutal reality of the oven. We are going to strip away the fluff and look at the raw data of dough. If you cannot master the Water Cracker Audit, you cannot claim to understand the foundational architecture of baking. Brace yourself for a high-tension, high-reward deep dive into the most honest cracker in existence.
THE DATA MATRIX
| Metric | Specification |
|---|---|
| Prep Time | 15 Minutes |
| Execution Time | 25 Minutes |
| Yield | 40-50 Crackers |
| Complexity (1-10) | 4 |
| Estimated Cost per Serving | $0.12 |
THE GATHERS
Ingredient Protocol:
- 250g / 2 cups All-Purpose Flour (11.5% protein preferred)
- 120ml / 0.5 cup Room Temperature Water
- 28g / 2 tbsp Unsalted Butter (Chilled and cubed)
- 5g / 1 tsp Fine Sea Salt
- 2g / 0.5 tsp Baking Powder (Optional for slight lift)
- Extra Flour for dusting the work surface
Section A: Ingredient Quality Audit:
The primary failure point in a Water Cracker Audit is protein variance. If your flour is too "soft" (low protein), the crackers will be fragile and dusty. If it is too "hard" (bread flour), they will be tough like leather. Technical Fix: If using bread flour, increase the water by 5% to ensure full hydration of the extra gluten. If your water is extremely hard or contains high chlorine, it can inhibit enzyme activity. Technical Fix: Use filtered water to ensure a clean flavor profile and consistent dough elasticity. Finally, ensure your salt is fine-grain. Large crystals will not dissolve in this low-moisture environment, creating "hot spots" of salinity and structural weak points.
THE MASTERCLASS
1. The Dry Integration
Place your flour and salt into a large stainless steel mixing bowl. Use a digital scale for this; volume measurements are the enemy of consistency. Whisk the dry ingredients to aerate the mixture and ensure the leavening agent is perfectly distributed.
Pro Tip: Aeration is not just about clumps. It ensures that when the water hits the flour, the hydration happens simultaneously across the entire mass, preventing "dry pockets" that lead to uneven baking.
2. The Lipid Rub
Add the chilled butter cubes. Use a bench scraper or your fingertips to work the fat into the flour until the mixture resembles coarse sand. We are not looking for large flakes like a pie crust. We want the fat to coat the flour particles to slightly inhibit gluten development.
Pro Tip: This process is known as "shortening" the gluten strands. Even in a low-lipid cracker, this tiny amount of fat provides the necessary lubrication to allow the dough to be rolled to a paper-thin thickness without snapping back.
3. Precision Hydration
Create a well in the center and pour in the water. Use a stiff spatula to bring the dough together. It will look shaggy and dry at first. Resist the urge to add more water. Turn it onto a clean surface and knead for exactly three minutes until a smooth, viscous elasticity develops.
Pro Tip: Over-hydrating is a fatal error. Excess water requires longer bake times, which can lead to a "stale" flavor before the cracker even leaves the oven. The dough should feel like cold modeling clay.
4. The Tension Rest
Wrap the dough tightly in plastic wrap and let it sit at room temperature for 30 minutes. This is not optional. You are allowing the gluten network to relax and the moisture to migrate to the center of every flour granule.
Pro Tip: Skipping the rest period results in "shrinkage." If you roll the dough and it pulls back like a rubber band, your molecular structure is too tense. A rested dough yields a flatter, more professional finish.
5. The High-Tension Roll
Divide the dough into four manageable pieces. Using a heavy rolling pin or a pasta machine, roll the dough until it is translucent. You should be able to see the shadow of your hand through it. Use a circular cutter to stamp out your rounds and prick them several times with a fork or a docker.
Pro Tip: Pricking the dough (docking) prevents large steam bubbles from lifting the layers. You want a flat, uniform surface that maximizes the Maillard reaction across the entire plane.
6. The Thermal Strike
Place the rounds on a perforated baking sheet. Bake at 200C (400F) for 8 to 10 minutes. The crackers should be pale with very slight golden edges. They must be completely dry to the touch before removal.
Pro Tip: Use an infrared thermometer to check your oven's true deck temperature. Hot spots will cause uneven browning. A perforated sheet allows hot air to circulate under the cracker, ensuring a crisp bottom.
Section B: Prep & Timing Fault-Lines:
The most common human error is the "slow roll." If the dough sits out too long while you are cutting shapes, it dehydrates and becomes brittle. Work in small batches and keep the remaining dough covered. Another fault-line is the "cooling lag." If you stack hot crackers, the residual steam will soften them. Technical Fix: Immediately transfer the crackers to a wire cooling rack in a single layer to allow the moisture to escape into the atmosphere.
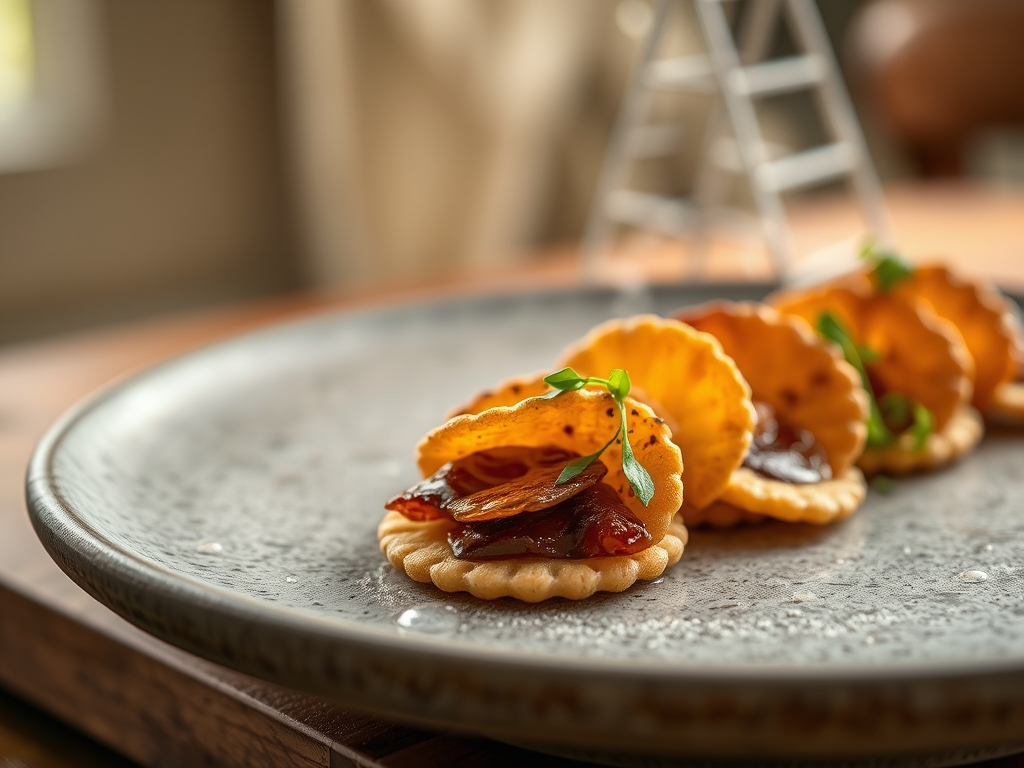
THE VISUAL SPECTRUM
Section C: Thermal & Visual Troubleshooting:
Referencing our Masterclass photo, look for the "blistered" surface. Those tiny micro-bubbles are a sign of perfect hydration and immediate heat transfer. If your crackers are flat and dull, your oven was too cold. If they are dark brown, you have scorched the delicate sugars in the flour, resulting in a bitter "burnt toast" profile. If the edges curl upward, your dough was rolled unevenly; the thinner edges cooked faster and contracted. Technical Fix: Ensure your rolling pin is level. If you see "white spots" in the center of a baked cracker, it is undercooked. Return it to the oven at a lower temperature to render out the remaining moisture without further browning.
THE DEEP DIVE
Macro Nutrition Profile:
These are the elite athletes of the snack world. Per serving (5 crackers), you are looking at approximately 70 calories, 1.5g of fat, 12g of carbohydrates, and 2g of protein. They are virtually free of cholesterol and trans fats, making them the perfect "clean" vessel for high-fat cheeses or piquant spreads.
Dietary Swaps:
- Vegan: Replace the butter with a high-quality refined coconut oil or a neutral vegetable oil. The snap remains identical.
- Gluten-Free: This is difficult as gluten provides the "tension." Use a high-quality 1-to-1 blend containing Xanthan gum, but reduce water by 10% to prevent a gummy interior.
- Keto: Substitute flour with almond flour and egg white. Note: The "snap" will be replaced by a "crunch" as the molecular structure changes from starch-based to protein-based.
Meal Prep & Reheating Science:
To maintain the molecular integrity, store these in an airtight glass container with a silica gel packet. If they lose their snap due to humidity, do not microwave them. Microwaves agitate water molecules and will make them rubbery. Instead, "flash" them in a 150C (300F) oven for three minutes to re-evaporate any absorbed surface moisture.
THE KITCHEN TABLE
Why are my crackers tough instead of crisp?
You likely over-worked the dough or used flour with too much protein. This creates a dense gluten web that resists shattering. Next time, reduce your kneading time and ensure the dough rests for at least 30 minutes.
Can I add herbs or spices to the dough?
Absolutely. Infuse the dough with dried rosemary or cracked black pepper during the "Dry Integration" phase. Avoid fresh herbs, as their moisture content can create localized steam pockets and lead to uneven browning during the bake.
My crackers are browning too fast on the bottom.
Your baking sheet is absorbing too much direct heat. Move the rack to a higher position in the oven or use a double-layered "air" sheet. This buffers the thermal transfer and allows the top to catch up.
How thin is "too thin" for the dough?
In a Water Cracker Audit, there is no such thing as too thin until the dough literally tears. The thinner the sheet, the more spectacular the snap. Aim for the thickness of a heavy cardstock for the best results.

